How to Choose a Roof Insulation Protection Board
When you’re planning a roofing project, the often‑overlooked roof insulation protection board can make the difference between a comfortable home and a leaky, energy‑draining nightmare. This guide walks you through the why, the what, and the how, so you can pick a board that fits your climate, budget, and long‑term maintenance plan.
Why a Protection Board Matters
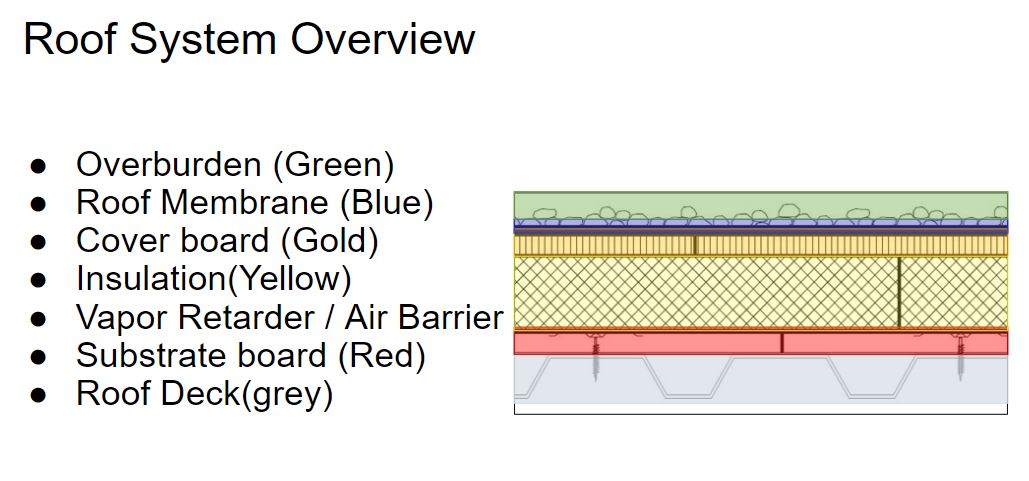
At its core, a protection board shields the insulation layer from moisture, wind, and mechanical wear. Without it, water can seep through roof membranes, soak the insulation, and dramatically reduce its R‑value. Over time, that loss translates into higher heating bills and a higher risk of mold growth inside the attic.
Beyond moisture control, the board also adds a level of fire resistance and provides a stable platform for the final roofing material—whether that’s shingles, tiles, or metal panels. Think of it as a buffer that lets each component do its job without compromising the others.
Common Types of Roof Insulation Protection Boards
- Rigid Polyisocyanurate (PIR) Boards: Offer one of the highest R‑values per inch and include a foil facing for added moisture resistance.
- Extruded Polystyrene (XPS) Panels: Known for their compressive strength, they’re a solid choice for flat roofs that bear heavier loads.
- Mineral Wool Boards: Provide excellent fire rating and sound‑proofing, though they’re heavier and can absorb moisture if not sealed properly.
- Foam‑Backed OSB (Oriented Strand Board): Combines structural support with insulation, often used in residential renovations where a single‑layer solution saves time.
Each material has trade‑offs. PIR excels in thin‑profile applications, XPS holds up under foot traffic, mineral wool shines where fire safety is paramount, and foam‑backed OSB simplifies installation for DIY homeowners.
Installing a Protection Board: Step‑by‑Step Overview
Before you start, verify that the existing roof deck is clean, dry, and free of protruding nails. A solid substrate ensures the board adheres correctly and won’t shift under wind uplift.
- Measure the roof area accurately, then cut the boards to fit, leaving a small expansion gap (about ½ in) around edges.
- Lay down a compatible vapor‑retarder membrane if your board doesn’t already include one. Overlap seams by at least 6 in and seal with roofing tape.
- Position the protection boards, staggering joints similar to brickwork. This reduces straight‑line weak spots.
- Secure each board with corrosion‑resistant screws or nails, following the manufacturer’s spacing guidelines—usually every 12–18 in along the edges and every 24 in in the field.
- Apply a generous bead of roofing sealant over every fastener and joint. This final seal keeps wind‑driven rain out of the insulation core.
When in doubt, consult the board’s installation manual; many manufacturers provide video tutorials that clarify tricky details like edge flashing or roof penetrations.
Maintaining Your Insulated Roof
Regular maintenance prolongs the life of both the protection board and the insulation underneath. Schedule a visual inspection at least twice a year—after winter storms and before the summer heat peaks.
Look for cracked seams, loose fasteners, or any signs of water pooling on the deck. Small issues can usually be repaired with additional sealant and a few replacement screws, but neglect can lead to costly water damage.
In regions with heavy snowfall, remove excess snow promptly to avoid prolonged pressure on the board. Most rigid panels can handle a modest load, but excessive weight can compress the insulation and reduce its thermal performance.
Common Mistakes to Avoid
- Skipping the Vapor Barrier: Even boards with foil facings need a continuous vapor barrier in cold climates to prevent condensation.
- Improper Overlap: Overlapping joints too little creates channels for water; too much can trap moisture between layers.
- Using the Wrong Fasteners: Galvanized screws are a must; stainless steel is advisable in coastal areas where salt corrosion is a concern.
- Ignoring Expansion Gaps: Boards expand and contract with temperature changes; a small gap prevents buckling.
FAQ
What’s the difference between a protection board and a roof underlayment?
A protection board is a rigid, insulated panel that adds thermal value and structural support, while an underlayment is a flexible, waterproof layer placed directly beneath the roofing material.
Can I install a protection board over an existing roof?
Yes, provided the old roof is in good condition and you follow proper attachment and sealing procedures. This approach is common in retrofit projects aiming to boost energy efficiency without a full tear‑off.
How thick should a protection board be for a residential roof?
Thickness varies by material, but most residential applications use 1‑in to 2‑in panels. Thicker boards raise the R‑value but add weight, so check your roof’s load capacity.
Is DIY installation realistic?
For small, simple roofs, many homeowners can handle the job with basic tools and careful attention to the manufacturer’s guidelines. Larger or steep‑slope roofs may require professional expertise to ensure safety and proper sealing.